Spinning up a VPN server programmatically on-demand

(Photo from airplane window over Sydney 🇦🇺)
My Private Internet Access subscription had expired and prices had jumped up from the last time I paid for a year. I don't need a VPN 24 hours per day, just an hour or two if I decide to work from a cafe, need airport wifi, or other scenarios where I'm out and about. Digital Ocean does hourly billing for its droplets (less than a cent per hour for it's $5/mo low-end droplet). I've set up OpenVPN servers in past jobs. I figured that I could just roll my own solution for this problem.
This post does not focus on installing and configuring OpenVPN. It focuses on how to spin up an on-demand OpenVPN VPS programmatically via the DigitalOcean API, CloudFlare API, and Python.
Prerequisites
- DigitalOcean account
- DigitalOcean droplet with OpenVPN server installed, tested, and client config downloaded (I recommend this tutorial, will use vpn-test as the droplet name in this tutorial)
- CloudFlare account and domain/sub-domain you want to use for this (will use vpntest.yourdomain.com in this tutorial)
- doctl, the command line interface to Digital Ocean (optional, for getting the snapshot ID)
Summary
- Get DO API token
- Get CloudFlare API token
- Snapshot your OpenVPN VPS
- Add initial DNS entry in CloudFlare
- Add your tokens and names to Python script, then spin up a VPS from your snapshot
1. Get your Digital Ocean API token
Head over to https://cloud.digitalocean.com/account/api/tokens/new to generate your token.
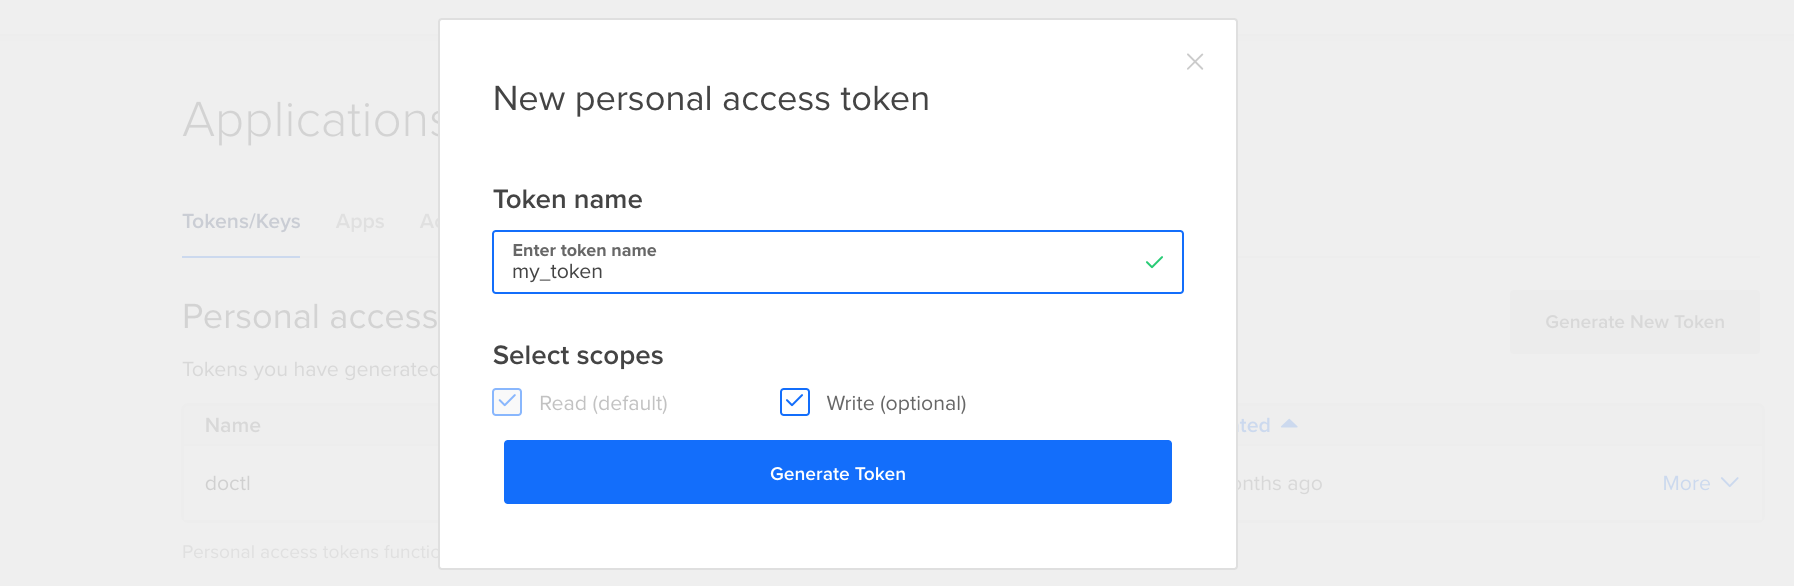
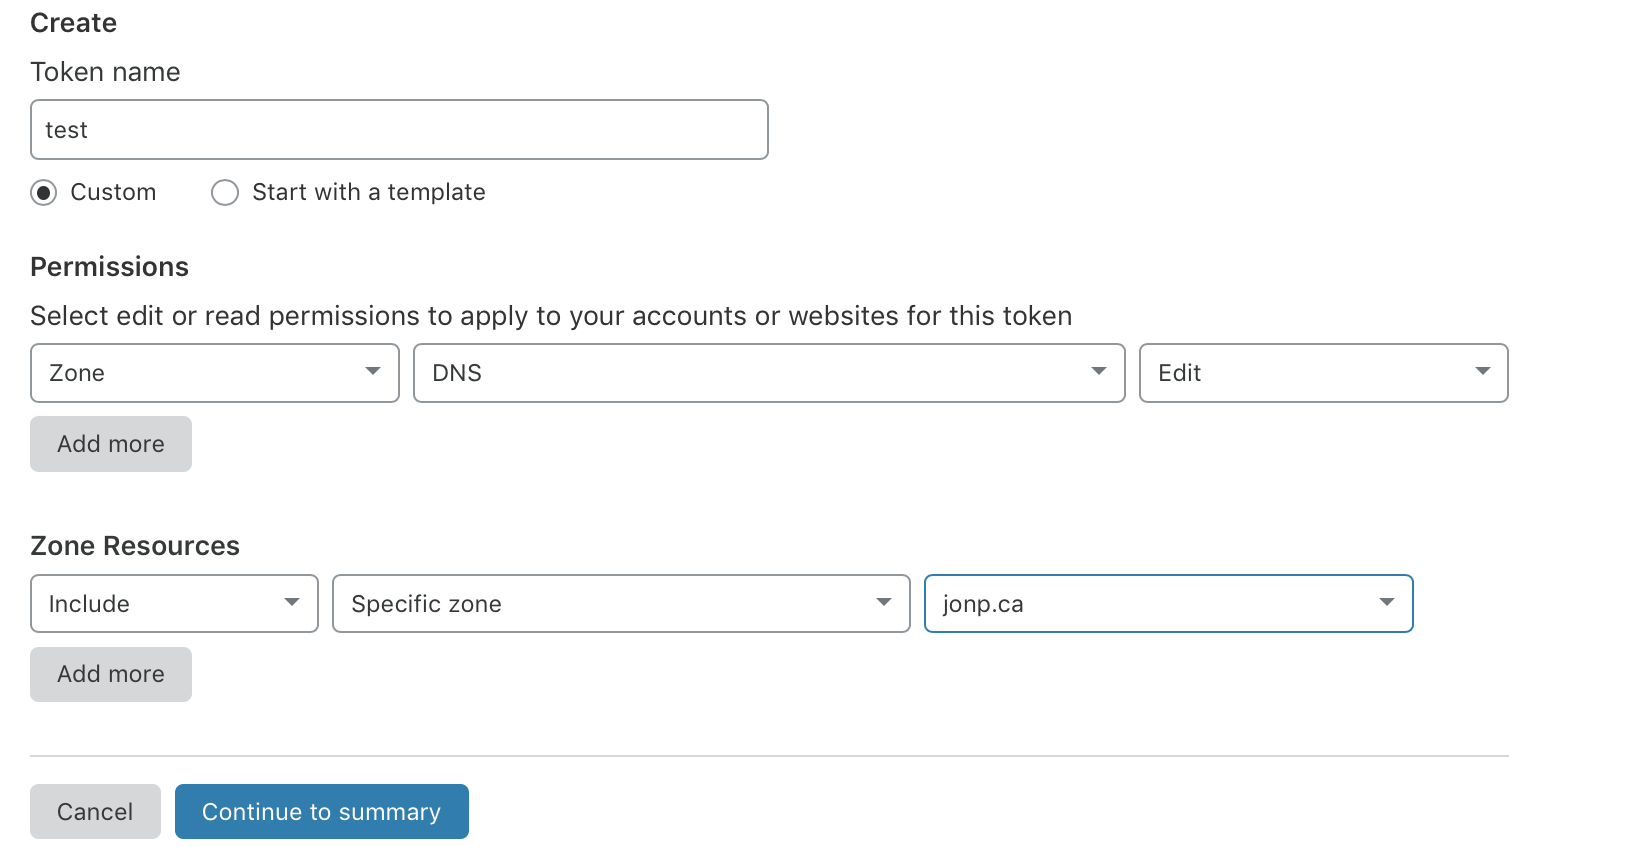
2. Get your CloudFlare API token
Head over to your CloudFlare dashboard. Click your profile, then API Tokens. Click Create Token.
3. Create a snapshot of your VPS
Get a list of your droplets. Get the ID of your VPN droplet (in this case, 123456789).
>>> doctl compute droplet list
ID           Name        Public IPv4
123456789    vpn-test    142.93.155.87
Create a snapshot of your vpn-test droplet.
>>> doctl compute droplet-action snapshot 123916924 --snapshot-name="vpn-snapshot"
ID           Status         Type        Started At
53964180    in-progress    snapshot    2019-03-26 15:32:51 +0000 UTC
Wait for the snapshot to be created. You can check the progress by listing your snapshots. If it shows up, it's ready to be used.
>>> doctl compute snapshot list
ID          Name                   Created at              Regions
53964180    vpn-test               2019-03-26T15:36:12Z    [tor1]
Now that you've got the snapshot ID, you can delete the VPS; it's not needed anymore. Either do this in the GUI, or use doctl since you've already got it installed.
Delete the droplet (ID is 123456789 from when you first got the list of droplets).
>>> doctl compute droplet delete 123456789
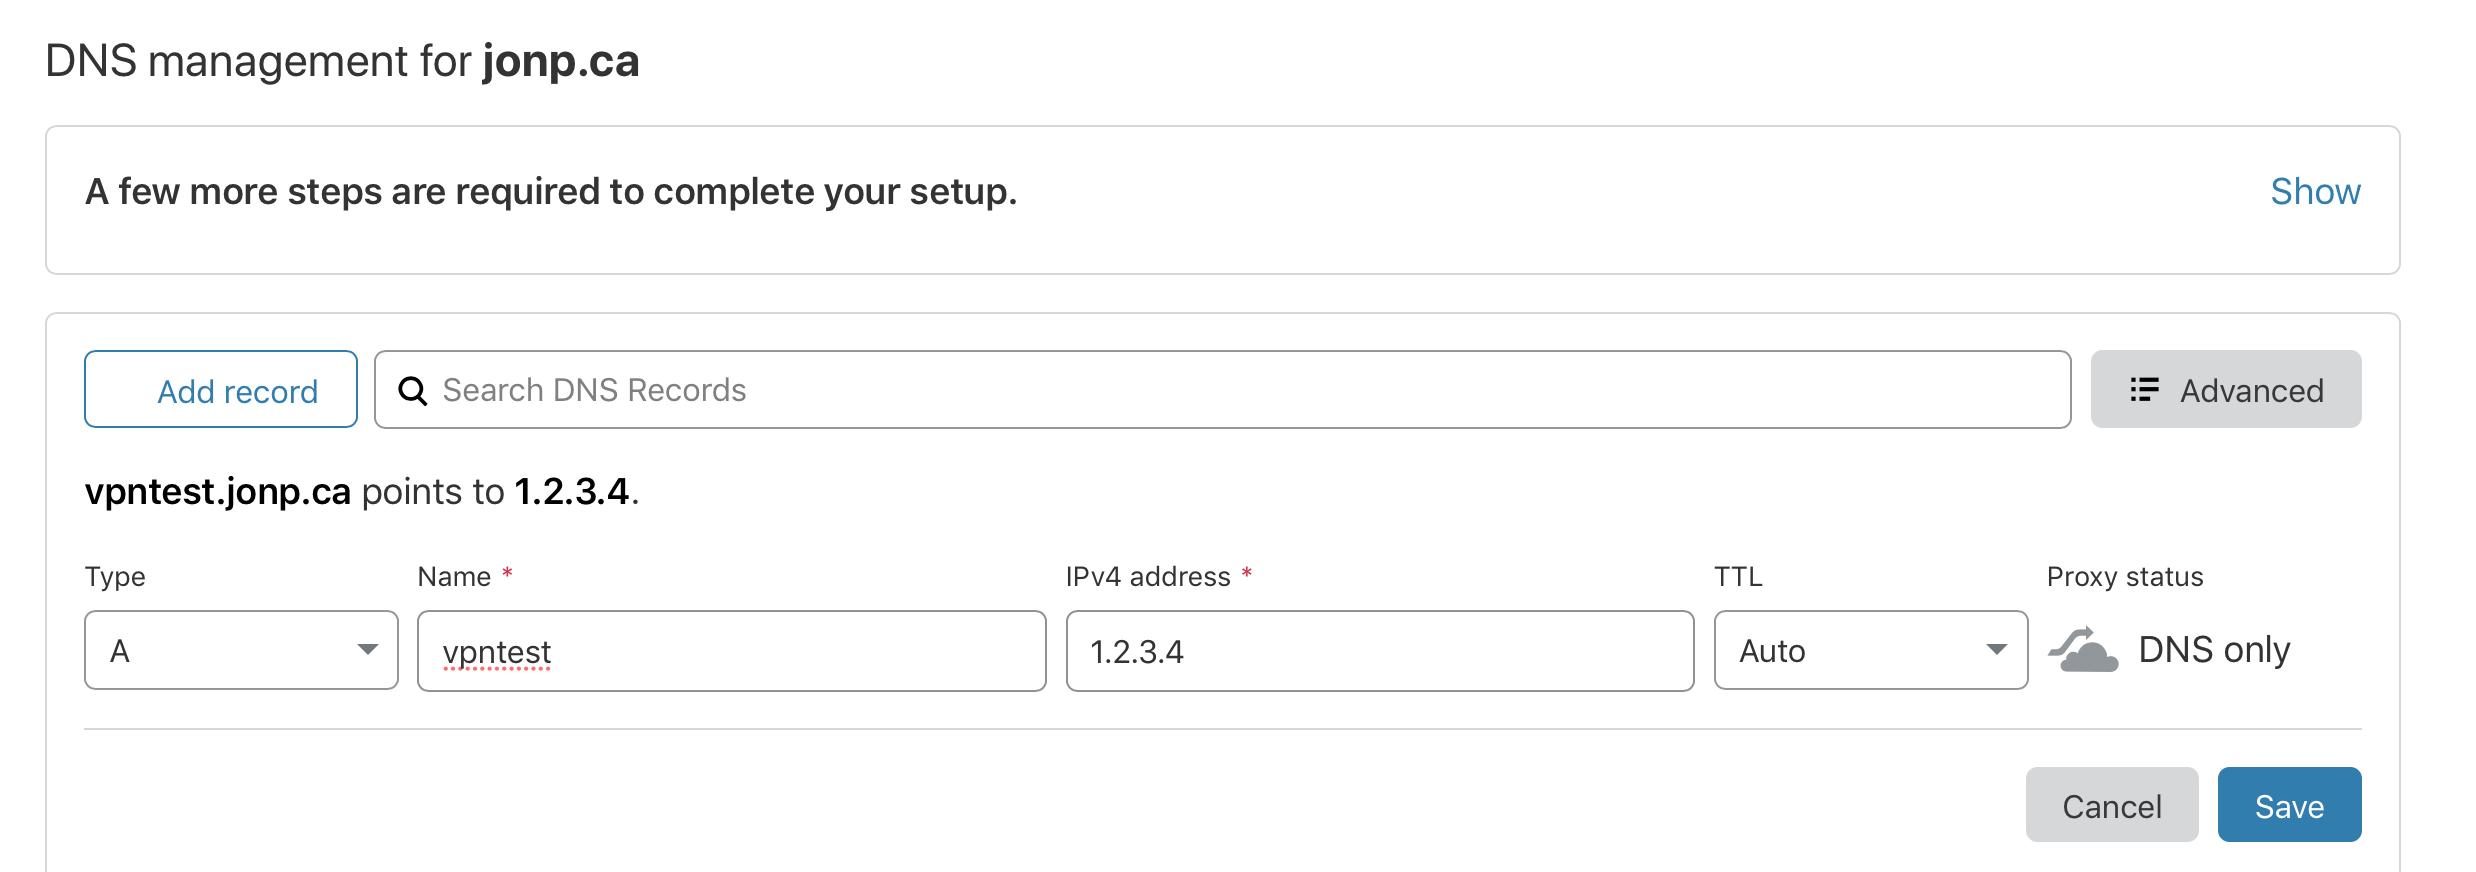
4. Add the DNS entry you want in Cloudflare
With OpenVPN, you can choose to use either an IP address or a DNS name for the server. In our case, we're going to use a DNS name so that the server can be deployed programmatically without changing the client config files.
I recommend vpn.yourdomain.com to start, but you may way to obfuscate it since some cafes, airports, and other free wifi services try to block access to VPN.
In Cloudflare, add an A record for the domain you want to use. This must be done the first time, then our script will update it each time after this. You can use the IP of your existing VPS, or a fake IP address, since these will be updated.
5. Using Python, spin up a droplet and update the DNS
Now that we've got a snapshot (ID: 53964180) and a DNS entry (vpntest.yourdomain.com), we can create an instance. Once the instance is created, we retrieve the IP address and update vpntest.yourdomain.com to point to it.
I've embedded my Python script at the bottom of this post using repl.it. I recommend copy/pasting the contents into a local text editor since you'll be entering your credentials, and repl.it repos are public by default.
Let's look at the interesting sections of the code.
5.1 Spinning up the droplet from the snapshot
After we run the droplet.create(), we check once per second to see if it's been spun up yet. If the action status is anything other than in-progress (completed, or there's an error) we write that. If it's in-progress, we just print a period (.).
# Fill these out
actions = droplet.get_actions()
for action in actions:
    while action.status != "completed":
        action.load()
        if action.status == "in-progress":
            print(".", sep=' ', end='', flush=True)
        else:
            print(action.status)
        time.sleep(1)
Once the droplet is spun up, we get the droplet's IP.
droplet.load()
ip_address = droplet.ip_address
5.2 Updating vpntest.yourdomain.com to point to the new droplet IP
The CloudFlare API (like most) work off of IDs rather than names, so we need both the zone_id (for yourdomain.com) and dns_record ID that matches vpntest.yourdomain.com in order to update it.
We first need to get the zone_id of the domain (yourdomain.com).
cf = CloudFlare.CloudFlare(email=CF_EMAIL, token=CF_TOKEN)
zones = cf.zones.get()
for zone in zones:
    if zone['name'] == CF_ZONE_NAME:
        zone_id = zone['id']
        zone_name = zone['name']
        print(zone_id, zone_name)
After that, we get the subdomains (dns_records) of that domain (we're looking for vpntest.yourdomain.com).
params = {'name':CF_DNS_NAME, 'match':'all', 'type':ip_address_type}
dns_records = cf.zones.dns_records.get(zone_id, params=params)
Finally, we PUT the droplet's IP address in the existing record.
# Update the record with the new IP address
for dns_record in dns_records:
    old_ip_address = dns_record['content']
    old_ip_address_type = dns_record['type']

    dns_record_id = dns_record['id']
    dns_record = {
        'name':CF_DNS_NAME,
        'type':ip_address_type,
        'content':ip_address
    }
    try:
        dns_record = cf.zones.dns_records.put(zone_id, dns_record_id, data=dns_record)
</end>
Of course, this is a pretty basic implementation that simply spins up a droplet and updates a DNS record. One could easily extend this to accept command line arguments and allow you to select which snapshot to create a VPS from. I use this to choose between an OpenVPN server running on UDP/1194, or another on TCP/443 to evade firewall blocking.
One could also write an argument to delete the droplet once you're done with it by passing the droplet ID back in and running a DELETE.