How to improve your Zoom/Skype teleconferencing game

Teleconferencing seems like an easy thing to get right, especially with webcams and good noise-canceling microphones being built into most laptops these days. If the environment is quiet and and lighting is good, it can be fine. But I've participated in a lot of meetings where I could hear myself out of the participant's speakers, the video was choppy, or the background noises made it difficult to hear participant's voices properly.
I figured with all of society working remotely for the foreseeable future, I would publish my suggestions on how to videoconference more effectively.
How to avoid blurry/pixelated video and choppy audio
Your internet connection needs to be stable and relatively fast for this to work.
There are two components to your connection:
- The path from your computer to your router (local)
- The path from your router to the destination server, either direct to the participant or to the Google/Zoom server (remote)
Aside from the suggestions below, there are more technical ways of optimizing your connection, such as tunnelling through a VPN to avoid packet prioritization or forcibly route around known-bad routes. But these will be saved for another day.
1. Local setup
Optimizations
- Use a wired ethernet connection
OR - Use 802.11ac router or AP
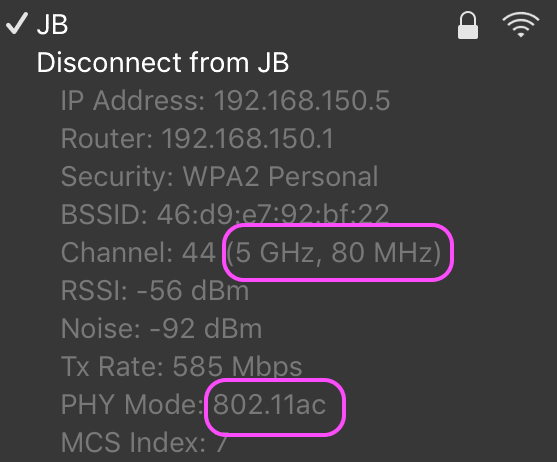
- Use 5GHz bands (as opposed to 2.4GHz) for less interference (since they don't go as far at equal power levels)
- If you can, use 80MHz channel width (as opposed to 40MHz or 20MHz) for the fastest speeds
- If on a someone else's network and there are multiple names (such as Cafe and Cafe5), use Cafe5 since it's likely the 5GHz option
On Mac, if you Option-click the Airport icon in your menu bar, you can view the technical details about how you're connected to verify you're set up correctly.

2. Remote setup
The remote path goes from your router and ISP to the destination. There's not much you can do once your packets leave your ISP, but you can optimize your connection by choosing a good package from your ISP.
Have you ever been in the situation where you could see and hear the other person clearly, but they complained about dropouts and blurred video on your side? Or vice-versa? This could be due to an asymmetry between your connections. One person could have a fast enough connection and another could have a slow connection. Complicating this is that many people don't have symmetric upload/download speeds.

In the example on the left, both Alice and Bob have fast enough upload and download speeds, so they can both receive and transmit clear audio and video. But in the example on the right, Bob cheaped out and got an internet connection with a slow upload speed. As a result, he's able to see and hear Alice perfectly, but Alice receives choppy audio and video from Bob.
And with Bob being Bob, he will probably blame Alice since he "can see her perfectly".
Optimizations
- Get a connection with at least 20 Mbps download and upload speeds (to allow for other non-videoconference traffic to get through and not affect your call)
- Ideally, 100 Mbps symmetric (100 Mbps up/100 Mbps down) is a minimum bar in an urban area; with this you should have zero issues even when sharing the connection with others
- Get fibre-to-the-home (FTTH) if available, or fibre-to-the-node/neighbourhood (FTTN) as an alternative; avoid straight DSL or Cable
How to have crystal-clear, easy-to-understand audio
The easiest and simplest way to get vastly superior audio: use headphones, with a microphone near your mouth. With headphones, the the audio is playing directly in your ear, so the mic won't pick up the other person's voice playing out of speakers. The best noise cancellation in the world combined with the most expensive microphone is WORSE than just putting a microphone near your mouth!
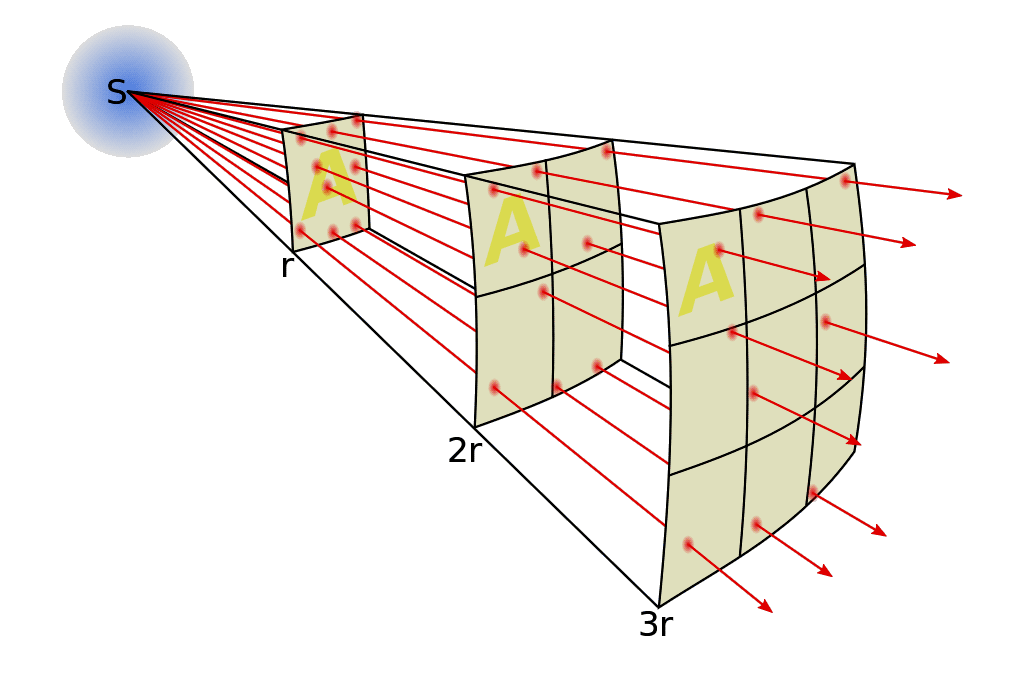
The inverse-square law applies to sound: if you double the distance from a microphone or speaker, sound volume drops by around 75% since sound travels in 3D space:

If you can't use a headset with a mic, try to get as close to the microphone as you can. Use earbuds anyway even if they don't have a mic just to prevent the other person's voice from being played out of your speakers and picked up by your mic.
If a mic is a metre away and an air conditioner is 10 metres away, but ten times louder than your voice, you'd get interference and noise cancelling would have to work very hard.
To simulate the massive difference this makes, here's an example recording of my voice at each specified distance, plus white noise (to simulate an air conditioner or refrigerator) being generated two metres away:

Of course, only the voice audio gets louder since my voice is moving closer to the mic, but the noise source is fixed.
For each clip, let's normalize the volume levels on each clip. This brings the loudest sounds up to 100%, and the quieter sounds up a bit as well:

Zoomed in, each clip shows the background noise on the left and the voice waveform on the right. As you can see, the background noise is much thicker. In order to bring the voice audio up to 100%, the background noise got louder as well:

Let's look at the signal-to-noise ratio. You want a high ratio between signal (in this case, my voice) and noise (in this case, the simulated air conditioner). The green line is the peak voice signal, and the red line is the peak noise signal. The pink rectangle represents a unit of noise, and the black rectangles show the number of times louder the voice is compared to the noise.

For the 1 metre microphone distance distance, you get less than 3:1 ratio. From 50 cm, you get 7:1. And from 2 cm, you get 20:1; almost a three-fold improvement!
Optimizations
- Use headphones with a built-in mic
- If that's not available, use your non-mic earbuds instead of speakers and try to get close to the mic
How to look better than everyone else
Audio is more important than video. Choppy and blurry video can be tolerated as long as the audio is clear, not laggy, and doesn't cut out. But once you've got your internet connection and audio setup sorted, spend some time and get your video quality right.
There are already a lot of great tutorials on lighting, like this. So I'll keep my recommendations short:
- Get an external webcam (I recommend the Logitech c920).
- You might be thinking that built-in webcams are pretty great these days since the iPhone's front-facing camera works so well. Unfortunately, MacBook webcams are pretty bad compared to that, especially in low light.
- Notice the image noise as well as lack of detail in the shadows on Brinquitos' snout in the MacBook Pro image.

- Mount the external webcam on a small desktop tripod. This allows you to move or type on your laptop while in a videoconference and not have the movements or vibrations transmitted to the webcam, causing subtle vibrations in your image.
- Ensure your face is lighter than the background. Either sit near a window, or use an auxiliary light. If you need to use a desk lamp, bounce it off of a white sheet of paper so that the light isn't harsh on your face.
Dec 2020 Update: After this article was published, I found a tool that helped optimize the image from the C920. The main issue is that it has a blue cast (white balance too cool) by default.
I found Webcam Settings worked incredibly well to fix this. Some of the settings it can correct:
- white balance
- manual or autofocus
- zoom (digital)
- exposure
- image brightness/contrast (digital)
In the example below, warm sunlight was streaming in and the camera made it much too blue. I corrected white balance to show what it actually looked like, as well as bumped the brightness slightly to show my face better.

</end>
You need to optimize just a few things to make videoconferencing better! This makes you easier to see and hear so that you can get your point across faster and more easily.
Addendum
Although I used both Zoom and Skype in the title of this article because they are the most popular tools, I don't actually recommend using them.
Skype went from an excellent piece of software a decade ago and changed into a visual abomination that is vastly more difficult to use and far buggier than before. Zoom has had numerous issues with privacy: installing secret web servers on Macs, embedding FaceBook tracking, and now using the preflight script in a Mac package to install the entire app.
I highly recommend the use of Jitsi Meet. It runs in-browser or on an iOS or Android app, doesn't require an account, and the tech is based on WebRTC and is totally open source. It is funded by a videoconferencing company that makes money from enterprise-level features and support, and their customers are companies and users, not advertisers.
Dec 2020 Update: Since I published in March, Zoom has fixed numerous privacy and security issues with their Mac app. Jitsi seems to have had more trouble scaling than Zoom and I find the call quality and reliability isn't as good as other options.
